Store Setup Guide
First time configuration
ScryPOS Login Credentials
Congratulations! You have begun your first of next step on your TCG Store journey and signed up with ScryPOS. We're thrilled to have you on board and we eagerly welcome the opportunity to work with you to make ScryPOS the best possible system it can be to support your TCG and hobby empire. Whether you are running events out of your garage or uncorking Champaign and celebrating your 10th store milestone ScryPOS is here to serve & support you with our Australian based support team and industry experts.
If you are reading this your have received and paid your onboarding subscription and you are ready to start setting up your ScryPOS system for the first time.
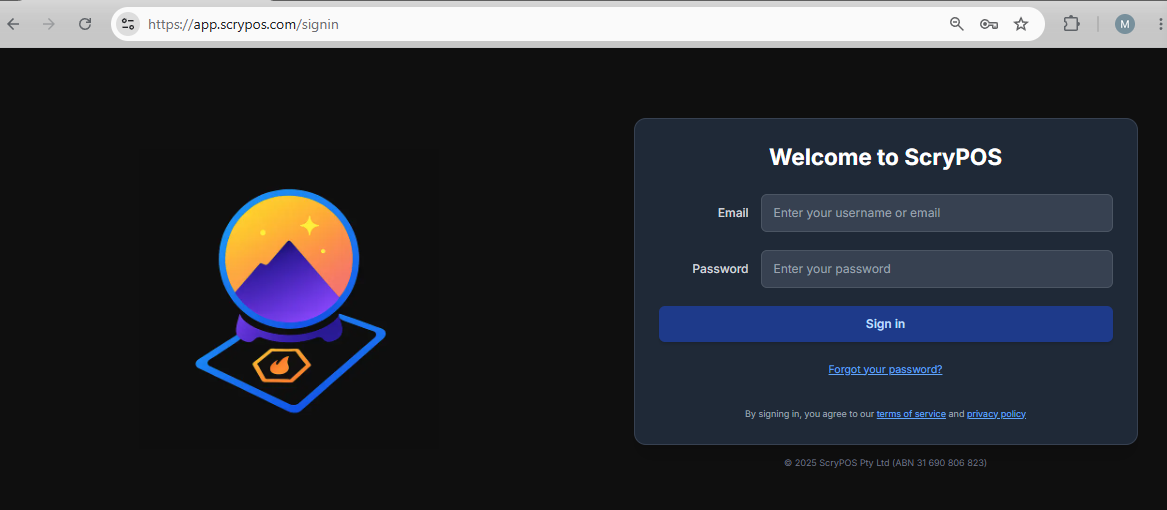
To access your portal please use the login credentials provided and head over to app.scrypos.com/signin and login with the credentials provided to you. If you are having any trouble logging in or you have not yet received your credentials please reach out to lifelink@scrypos.com
Configure your Store Details
The first thing you will want to do when accessing your ScryPOS system is configure your company details.
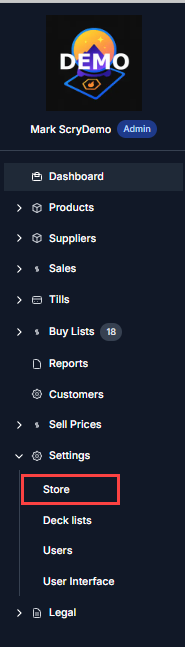
In the left hand menu you will go Settings > Store
Account Details
These will all be set by the ScryPOS team as part of onboarding, but you should verify these settings are correct: 
- Tenant Name: the name by which your store is known
- Contact Name: the name used by ScryPOS to identify the owner of the store
- Currency: the currency for all sales and purchases within the system. AUD (Australian dollars) is the only currency supported at this time:
NOTE: the currency selected here MUST match the configured currency in your Shopify store
- Country: controls country-specific settings and options through ScryPOS. Australia is the only country supported at this time
- Timezone: allows ScryPOS to identify what times may be more suitable for downtime, such as system upgrades or backups
Contact Details
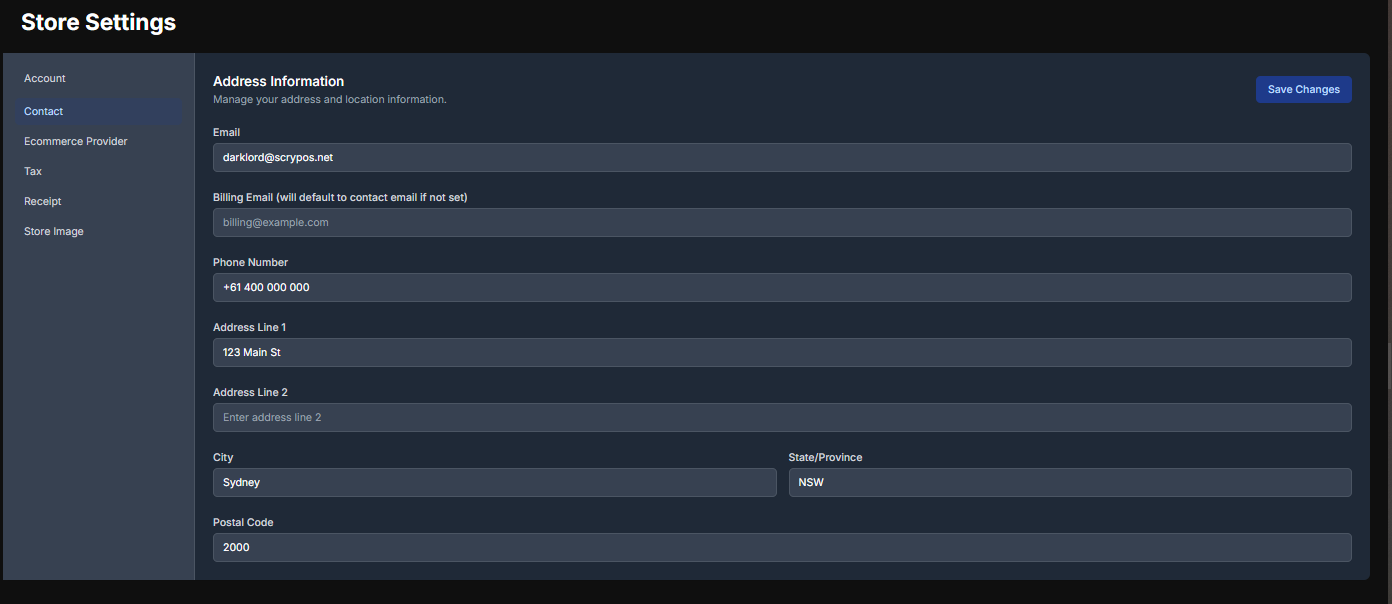
Update the Primary Company Contact details in Store Settings > Contact
For stores using ScryPOS's Multi-Location system billing for all locations will be sent to the billing contact email.
The address is used as the company's primary billing address. Location addresses will be configured later in Shopify.
Ecommerce Provider
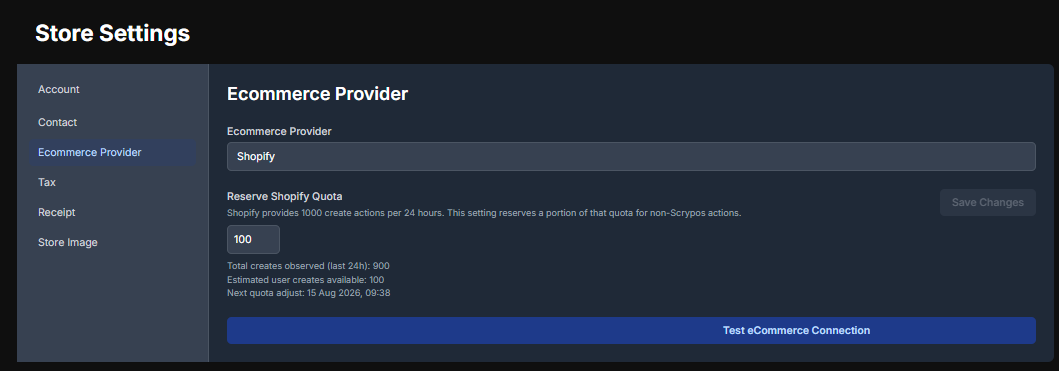
By default all stores will be using Shopify for the foreseeable future at the time of writing this.
Shopify limits the number of variants that can be created by external programs to 1000 in any 24 hour period. The Reserve Shopify Quote setting allows you to reserve some number of these operations for programs other than ScryPOS. Setting this to a high number will reduce the rate at which new products can be added you your store automatically.
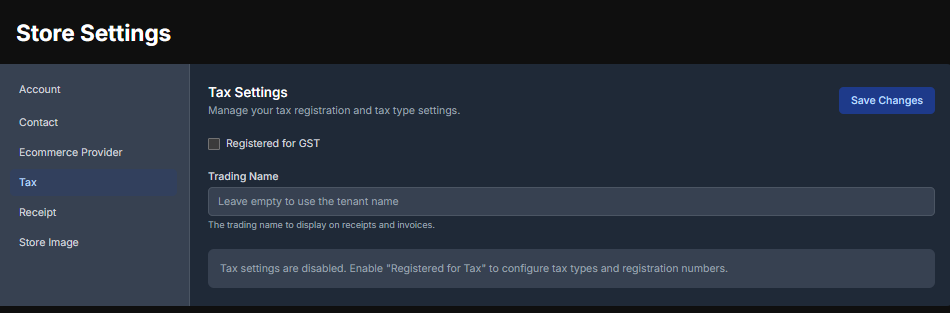
Tax Settings
These settings will be specific to the country which the ScryPOS store has been configured for. Use this to record your ABN, NZBN, Corporate Number etc. and relevant tax details
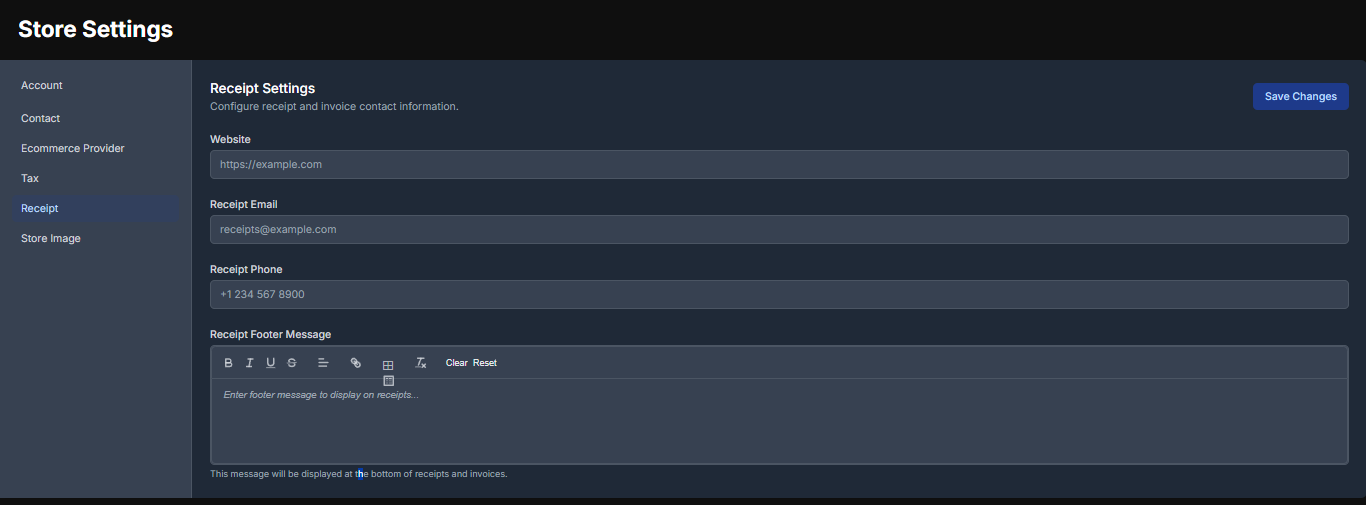
Receipt Settings
ScryPOS will generate customer receipts on all transactions that can be sent as tax invoices. These are the settings that control what customers will see on their receipts from sales at locations linked to this account.
(Changes coming here soon - currently this is configured for all locations to use the same receipt settings)
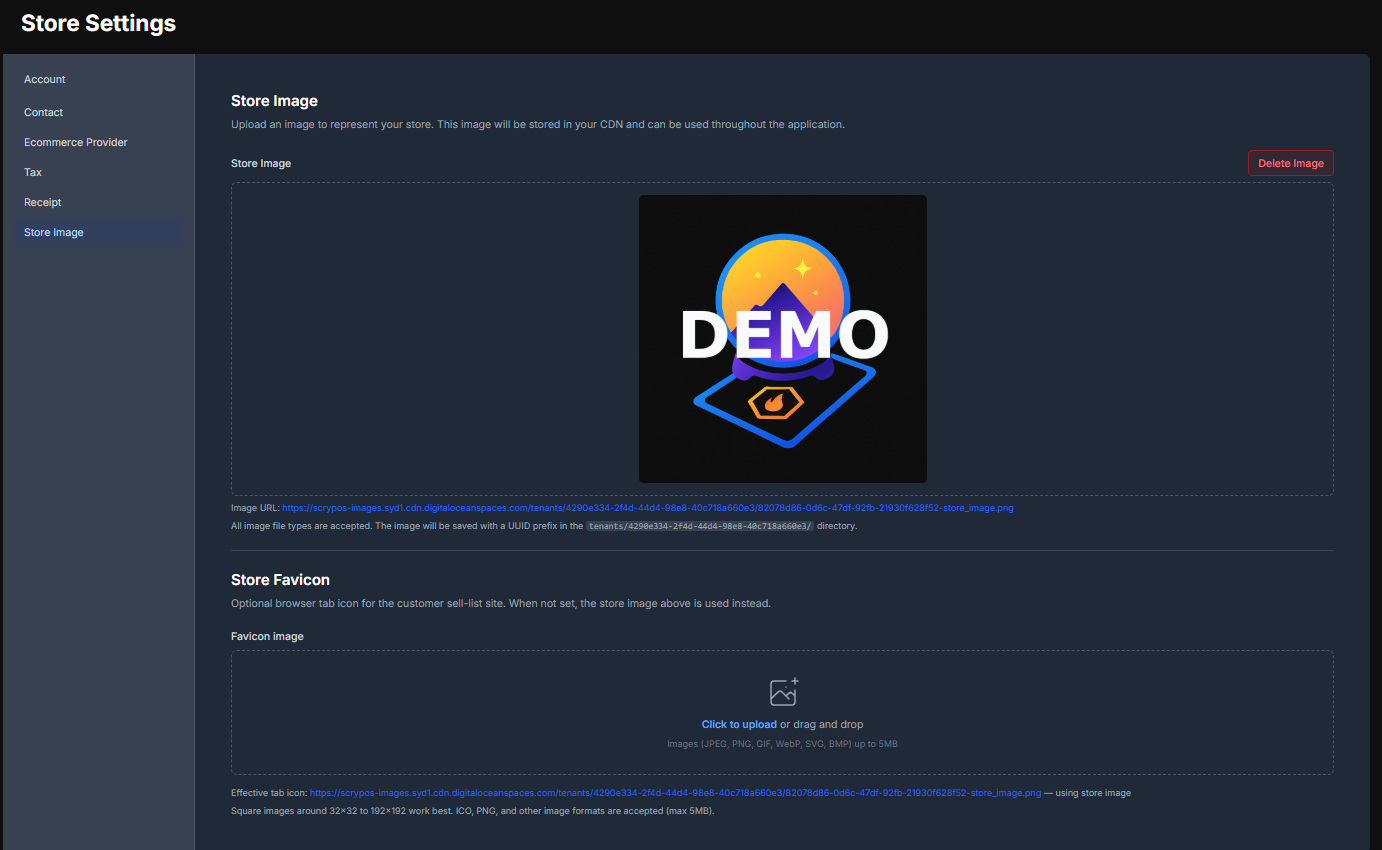
Store Image
This is where your company logo lives. Use a good quality image as this is the logo that will appear everywhere your customers interact with your business within the ScryPOS network.
Create Users & Staff Accounts
One of the next things you may want to consider adding are you store users.
ScryPOS has a tiered user level system that adds some levels of security to your data. It ensures you have privacy and full control over who in your organization can make stock adjustments and view sensitive data like sales and performance metrics.
Head to Settings > Users
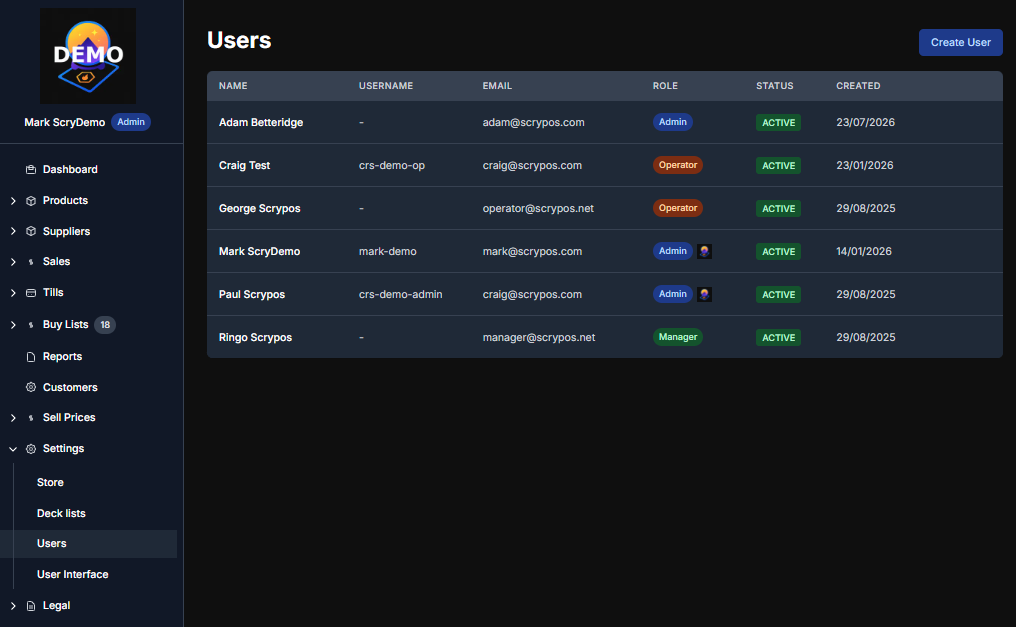
User Levels Summary
Operators: Can process incoming buy/sell lists, view transactions and process POS sales
Managers: Can access inventory adjustment tools
Admins: Can access reporting tools, system settings and can create/modify users
Shopify Locations
Along with your ScryPOS login credentials you would have received an email from Shopify requesting you to accept ownership of the Shopify system being transferred over to you. This step assumes that you have received and completed the process and now have access to your Shopify account.
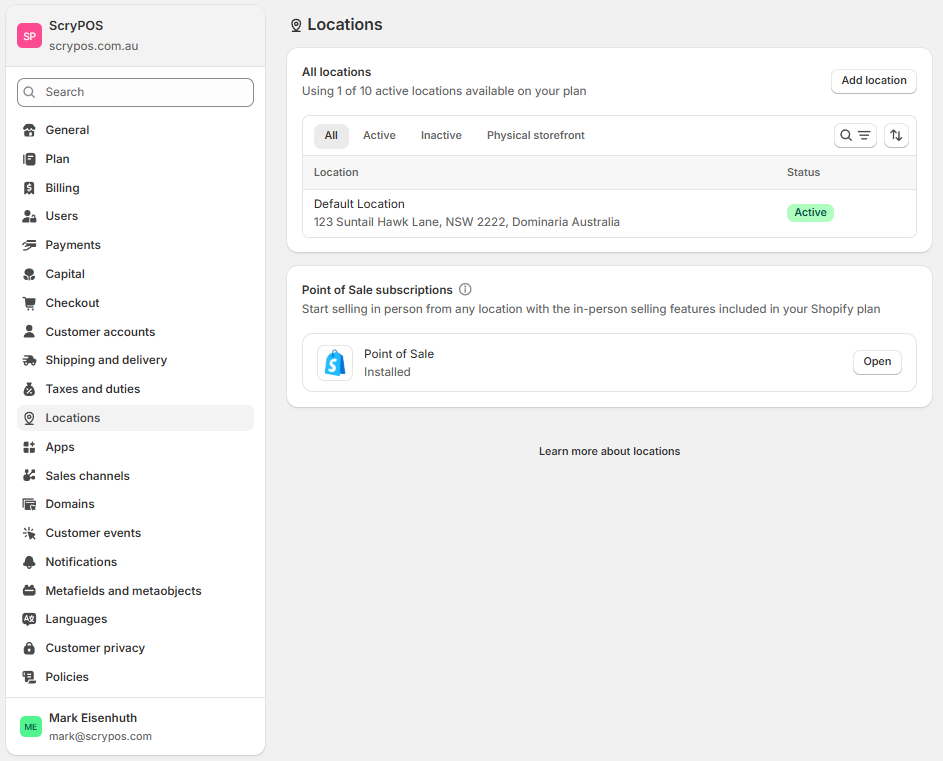
In your Shopify Account go to settings > Locations
Rather than pressing "Add Location" you will want to modify the default location to configure your first/primary location settings in Shopify
Locations in Shopify are where you configure
* Location Name
* Location Address
* In-Store Pickup, Shipping or Local Delivery Settings
On a basic plan at the time of writing this you can have up to 10 locations but please note Shopify is frequently changing and often restricting rather than expanding these numbers so there may be less locations available on a basic plan in future releases.
After your default location is modified if you have additional store locations to add you can start adding these. This may be other store locations or facilities like off-site warehousing facilities.
Please note location changes are not instantly sync'd to ScryPOS - these are sync'd automatically by a separate cron job running in the background so please allow up to 24 hours for location changes to be visible in ScryPOS
Other Shopify Settings
You will want to familiarise yourself with Shopify's settings as early as possible if you aren't already. Getting these right from day one will set you up for success and keep your out of trouble later down the line.
General Settings
These are your:
- Business Details (Corporation details required by your countries tax office)
- Primary Store Contact Details and Primary Store Address
- Order ID format - the code that represents your online sales
- Order Processing settings ("Don't fulfill automatically" is set by default and it is generally not advised to change this)
- On the build of Shopify available at this time this is also where "Store Transfer" settings live if you sell the business to someone else and need to transfer ownership elsewhere. Please keep in touch with ScryPOS before using this setting.
Plan Settings
This is your Shopify Subscription settings. Your plan determines what features and level of usability Shopify enables you to have.
Billing
This is how you pay your Shopify bills. They aren't lenient so be sure to keep this information up to date and to ensure you don't miss any payments. Missed payments can trigger them to restrict visibility to your site until payment is rectified.
Users
This is who can access your Shopify system. By default, if you are looking at these settings you are probably the sole user if you are on a basic plan. If you are on a plan that allows for multiple users they can all start to be created now. For Multi-Level organizations with multiple Shopify user accounts I strongly recommend exploring and configuring Shopify Roles to assign pre-set levels of access to your different users.
Payments
The fun one - this is where Shopify will pay you! This is also where you assign payment providers you want to facilitate through Shopify's checkout. There are hundreds of providers (i.e. PayPal, Afterpay, ZIP Pay, Klarna etc)
Checkout
These are you required and optional checkout fields and how your customers pay.
Shipping and Delivery
Essential for online stores mailing items out to customers this is where you configure your shipping profiles and connect carrier accounts.
Taxes and Duties
Worth spending some time reviewing and understanding this section if you plan to sell in international markets. If you want to sell internationally and need some assistance in configuring these settings it may be worth consulting a tax expert when configuring these.
Sales Channels
At the very least you will want to configure your Online Store sales channel as this is your Shopify website.
Domains
This is where you connect your existing domain name (website address i.e. scrypos.com.au) to Shopify. This will walk you through the process of configuring DNS records within your domain providers control panel or wherever your name servers are located (i,e, if your domain is hosted with Crazy Domains but you are using Microsoft Exchange's nameservers you will need to make DNS changes in Office 365 admin instead of Crazy Domains)
Notifications
You will need to add some CNAME records to your DNS for Shopify's Email domain authentication. This will help reduce the number of events of Shopify generated communications ending up in customers spam/junk folders
Policies
Company policy templates and docs. Worth consulting an expert when setting these us if your company policies are not already written.
Shopify Website
Under Sales Channels > Online Store you will see your websites Desktop and Mobile Theme Settings. This section is not intended to hell you exactly how you can or should build your website - you have a lot of freedom in how you approach this. But we will include some notes and tips to help you along your way.
This is where you get to develop your website. At this point in time ScryPOS has no custom Shopify integrations and so there is no limitations imposed on your store, theme by us. You can do whatever you want!
If you are coming from an existing Shopify store you can export your theme files from your previous store and import them into this Shopify account. Note this is not recommended when exporting a website developed by another service provider (i.e. exporting a BinderPOS website theme and using it here - you should only export and import a theme that you have the explicit ownership rights of)
If you require assistance with developing and laying out your initial Shopify website please contact lifelink@scrypos.com and we will be in touch with options for assistance.
Shopify Tips
Customer Dashboard
Customers in ScryPOS have their own Customer Dashboard and you can find the link to this in your own ScryPOS dashboard. Be sure to contextually link customer to their ScryPOS dashboard! This is where customers go to sell you cards and access their store credit for web purchases. If you want to add this to a Shopify menu you do this under "Content > Menus"
Persistent Carts (App)
Shopify does not natively support persistent carts. This means is a customer logs in on Shopify and creates a cart on their PC, if they log into their mobile device this cart will not automatically be carried across. Personally I have had a good experience using Persistent Cart ‑ Sync Devices by Customer First focus.
Shopify Flows (App)
Shopify is a great ecommerce solution but it does not do everything. The more you use it the more likely you are to find things that you wish it did slightly differently. Shopify Flows is an app that lets you create smart rule-based trigger automations to make Shopify work in a way that suits your needs better
Configure Your Sell Price Settings
In your ScryPOS Dashboard go to Sell Prices and configure your different price setting variables for your different catalogues.
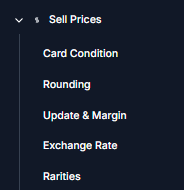
Note that system wide price setting changes can take 24-48 hours to finish running so it is best to make all of your changes in bulk and then to notify lifelink@scrypos.com when you have made changes so that we can force a price update on your system to ensure the prices are all updated as fast as possible.
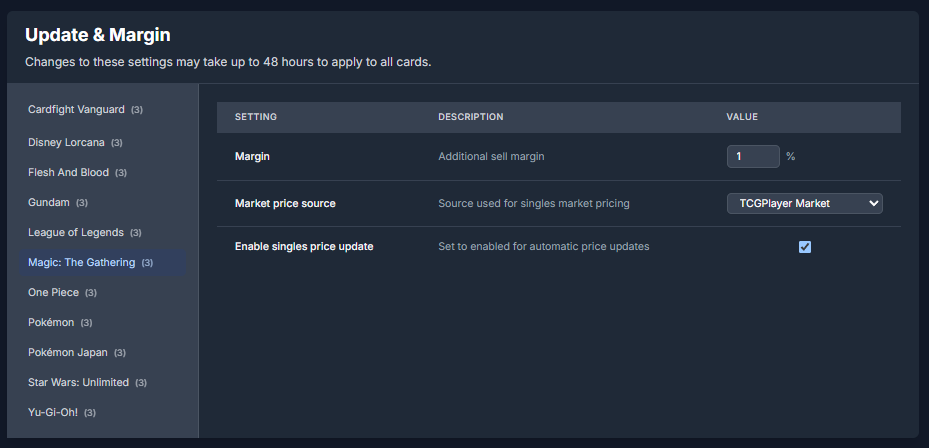
Update & Margin
By default pricing in the system is equal to "Market price source" converted to your stores native currency using currency conversion rates pulled from the European Reserve Bank (Current Conversion rate can be seen and verified from within the dashboard)
Update & Margin lets you define the margin you may want to add on top of the converted price for each game system.
For catalogues with multiple price sources this is where you define where the pricing is coming from (At the time of writing this we are providing prices from Price Charting and TCG Market Pricing but are working towards supporting Card Kingdom and Card Market. Other sources of pricing will be added in the future!)
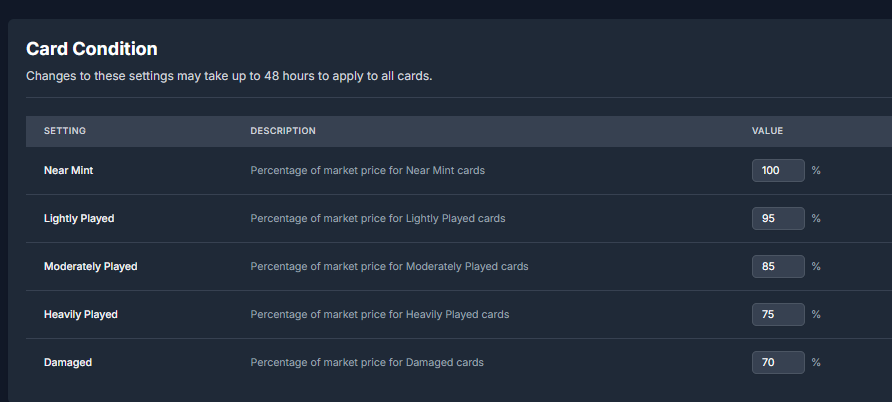
Card Condition
Card Condition is the % of the calculated sell price you want to sell your variants at. By default it is generally recommended to start at 100% for near mint and to scale based on condition but the system will allow you to set 110% if you want.
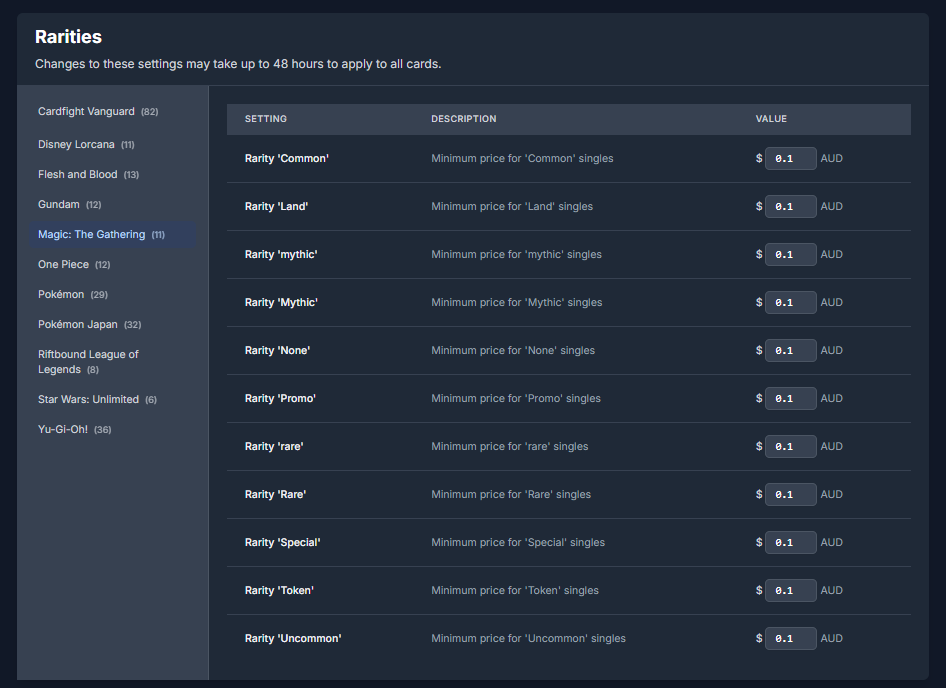
Rarities
These are your Floor Prices for each rarity and for each game system. If a price after all of the above calculations still falls below it's floor price it will be adjusted to it's floor price.
(Card condition will scale based on floor pricing when used)
Just reiterating: Once all of your price settings are set please let us know and we will push a price update!
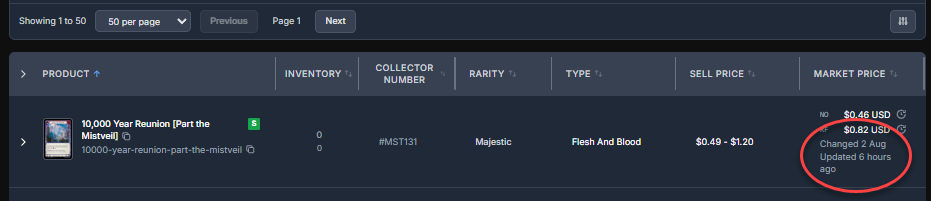
Note: if you are wanting to keep an eye on whether a price has updated or not - in Products > Singles each variant will show when it's price was last updated!
Buy / Sell List Settings and Price Rules
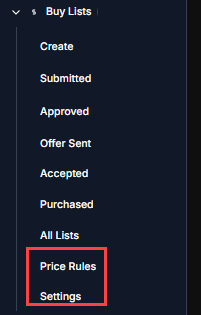
You don't necessarily need to set these up immediately but you will need to set Price Rules and Settings before you can use ScryPOS to start purchasing and processing buy / sell lists.
Price Rules
Price rules are configured based on Game System and you can drill down into specific sets & conditions.
You can also disable rules.
Rules are defined and applied based on Min and Max card value ranges.
By Default a rule does nothing on its own. When you create a rule you need to create "bands" to tell the rule what to do.
In the below example we have 3 bands for a generic MTG purchasing rule.
We have 3x Store Credit bands that will purchase cards valued up to $20 at 80% Store Credit if we have 0 copies on hand, Purchase at 70% store credit if we have 1 or more copies but 4 or less and a final band that buy the 5th - 8th copy at 65% store credit.
You can be a broad or specific with your rules and bands as you would like to be!
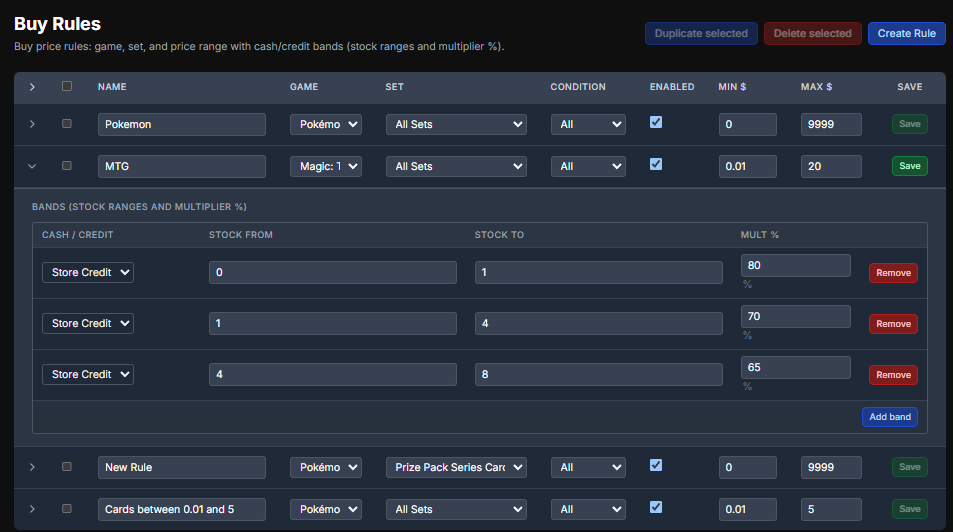
Tip: The most specific rule will always take precedence over other rules. Common example for this is you can create purchasing rules for Pokémon singles that capture all of them but then you can create a specific rule for Pokémon Singles from "Prize Pack Series Cards" with no bands associated with it to prevent the purchase of Pokémon Play! Prize Cards
Settings
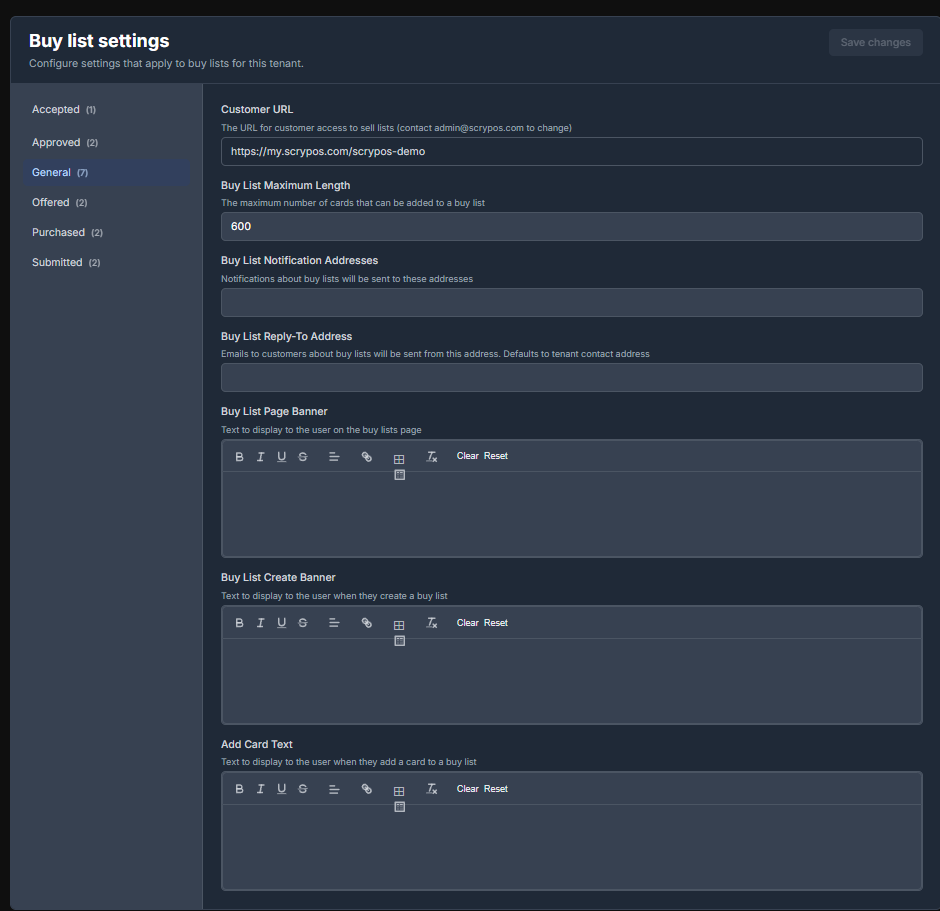
Buy list settings are worth sitting down and going through in great detail. These are for
* Setting a buylist card limit
* Setting a buylist notification address (your email that you want to receive buylist related notifications to)
* The address customers will receive buylist emails from that they can reply to
* Messages that your customers will see at every phase of the buy list and customer dashboard.
Create Tills and Kiosks
Creating a Till
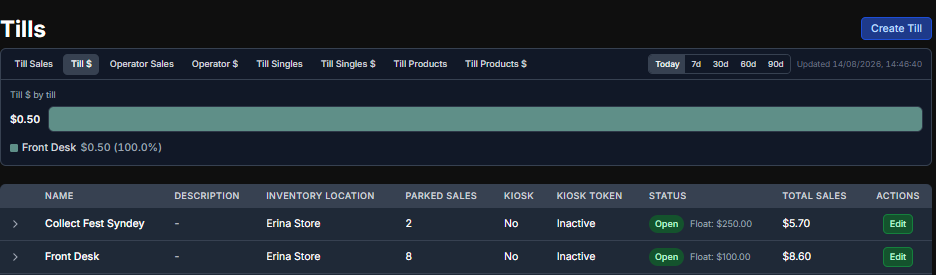
Here you can create your tills! You can many or few based on your specific needs. It is recommended to be pretty strict with how these tills are configured and used as there is a lot of reporting built into ScryPOS that allows you to analyse and report on the performance of your tills. This means if you trade at a market, card show, in store or vend on the road, if you have a till for each situation you can run analytics on each till to assess their performance against each other.
Go to Tills > Manage
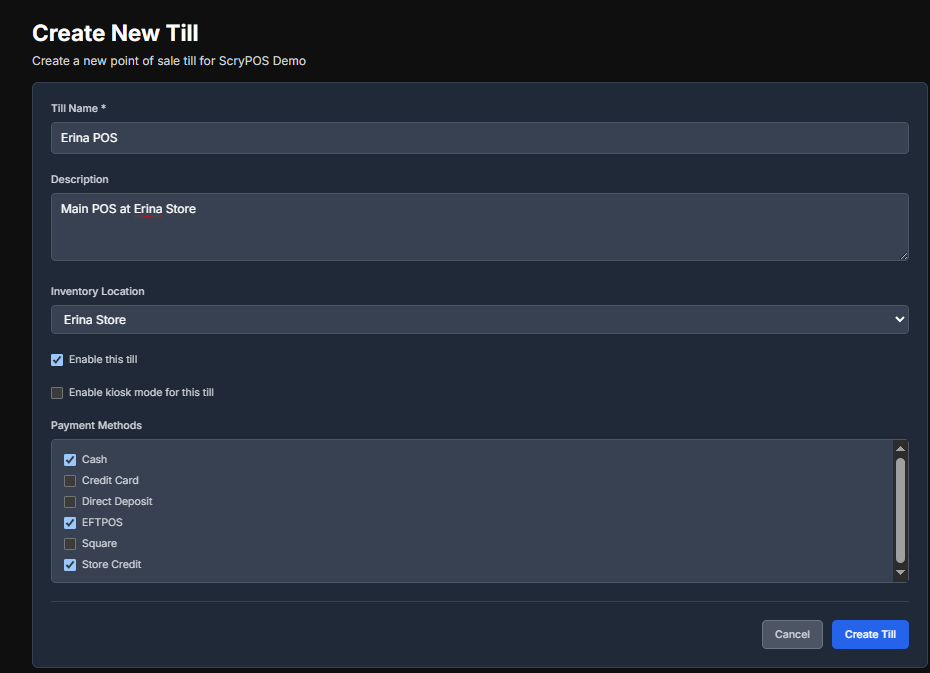
Create Till
Give your Till a Name
Assign it to an inventory Location
Select your payment methods (note these are referential only - these is no current support for automatic push in POS to Merchant Terminals)
Creating and Connecting a Kiosk
- Check with ScryPOS support (support@scrypos.com) that kiosk support is enabled for your account.
- Open the Tills->Manage menu and click Create Till
- Enter the name of the new Kiosk till and ensure the "Enable kiosk mode for this till" checkbox is enabled:

- Click "Create Till", and the list of tills will be displayed including the new kiosk till you just created.
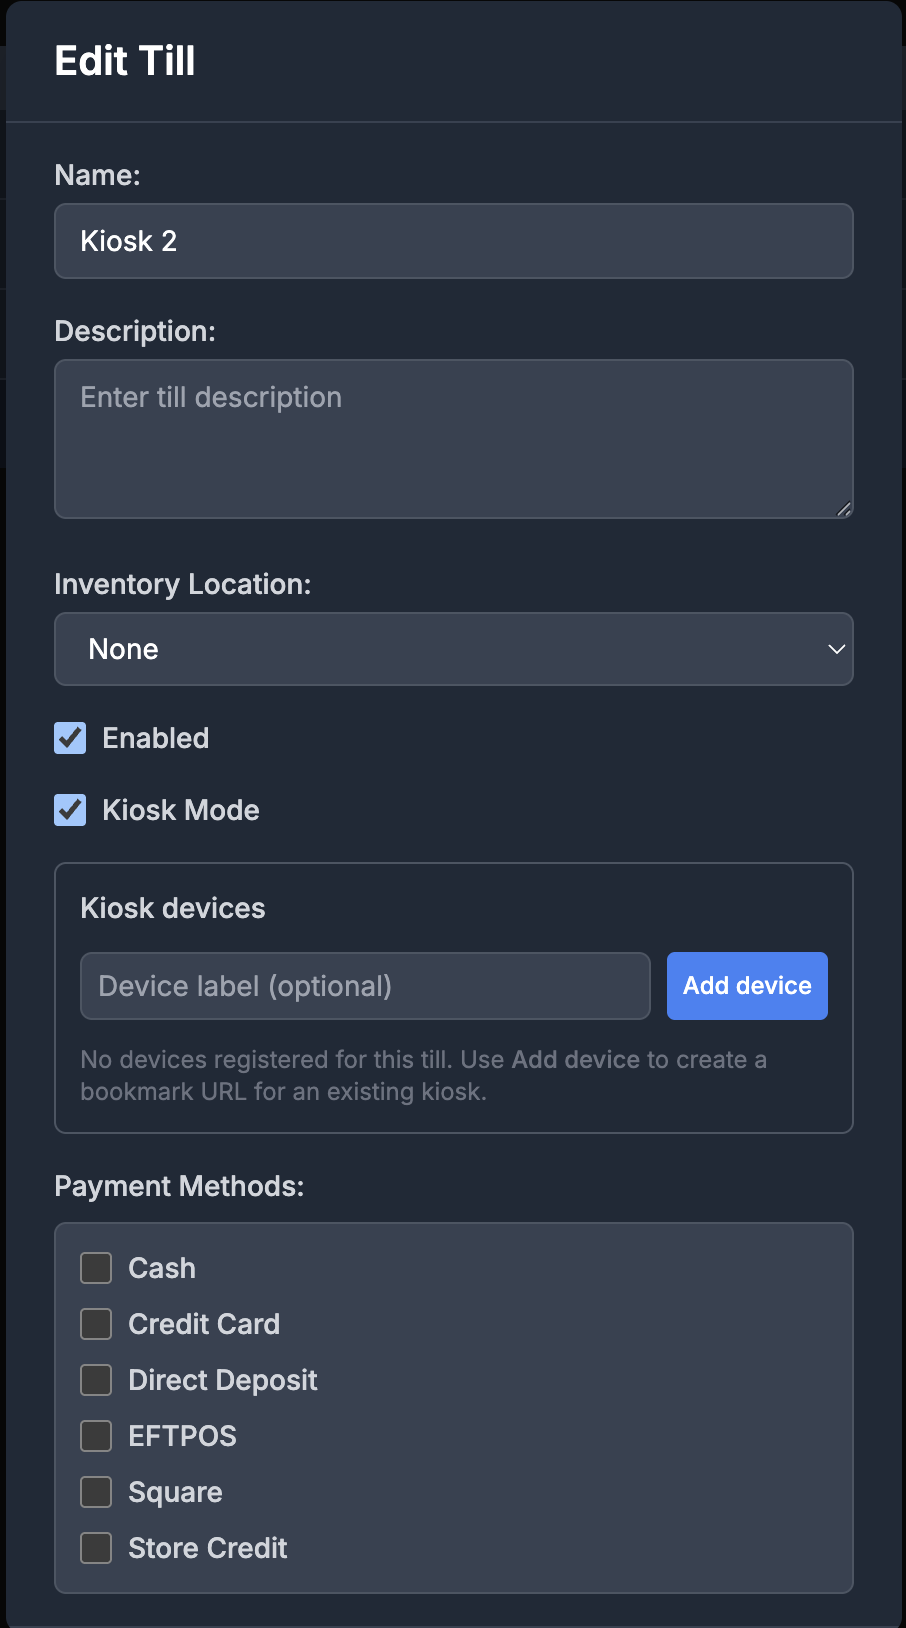
- Click on the "Edit" button on the row for the kiosk till. The following dialog should appear:

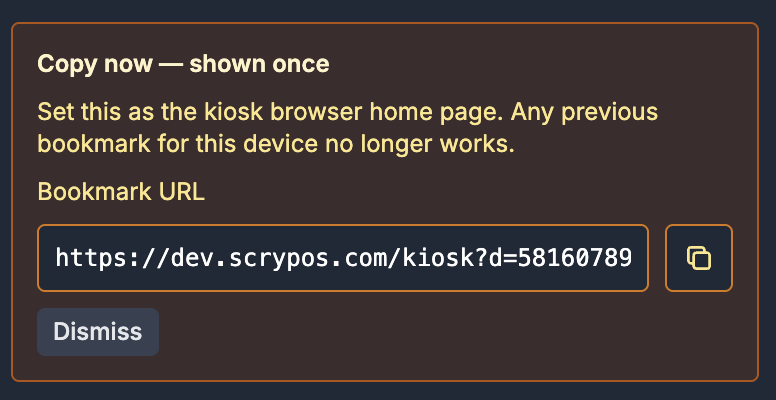
- Click on the "Add Device" button, and informaton similar to the following will appear:

This gives the URL that must be copied to your Kiosk machine to open the kiosk page. -
Click on the "copy" icon (shown below) to copy the new URL to the clipboard. From there, transfer the URL to the target kiosk device. This URL remain unchanged unless you choose to regenerate it.

- Close the edit till window by clicking Cancel.
-
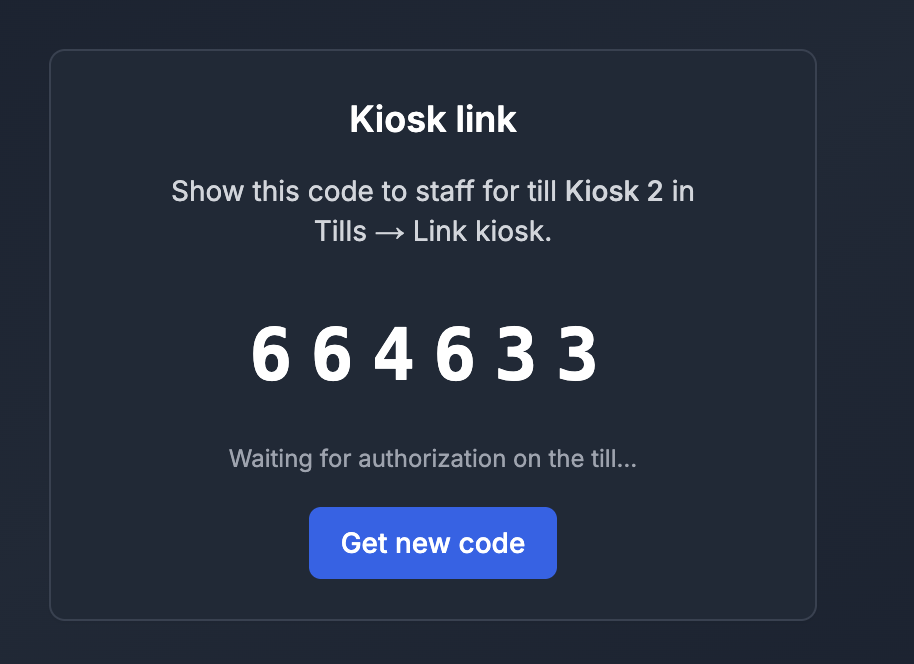
On the target kiosk device, open the bookmark URL. A dialog similar to the followng will appear:

Take a note of this number. It will be needed later.
IMPORTANT NOTE!!!
OPENING A KIOSK IN THE SAME BROWSER AS THE SCRYPOS DASHBOARD IS NOT SUPPORTED!ALWAYS USE A DIFFERENT MACHINE OR A DIFFERENT BROWSER (I.E. FIREFOX VS CHROME)
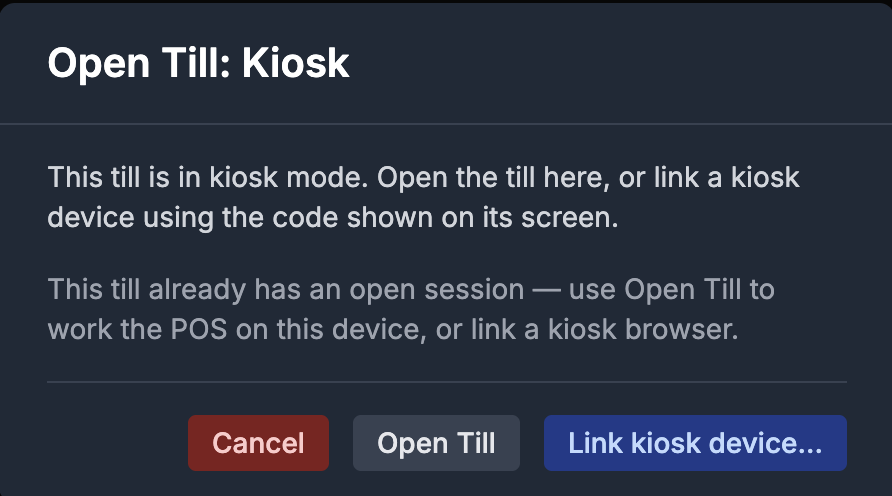
- On the ScryPOS dashboard, open the Tills->Manage menu and find the kiosk in the list of tills. Click on the row, and the following dialog will be displayed:

-
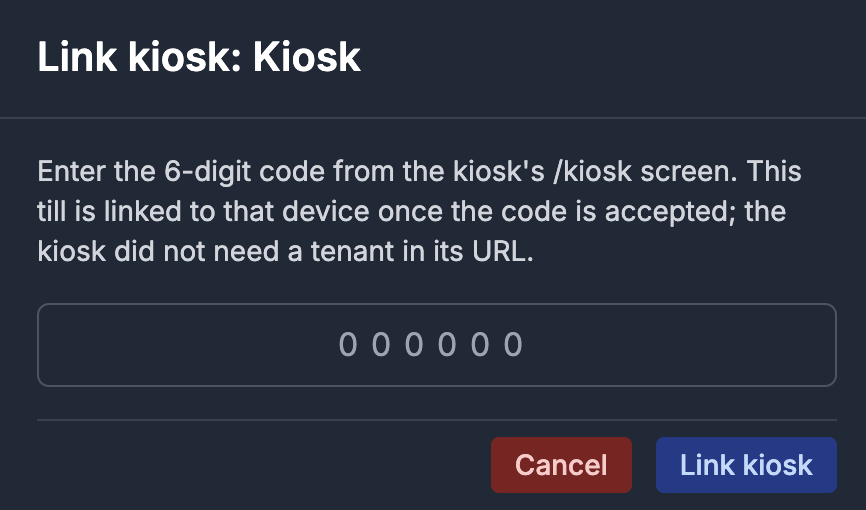
Click on "Link kiosk device", and the following dialog will be displayed:

-
Enter the number that was displayed by the kiosk in step 9, and click "Link kiosk".
-
The kiosk page should now refresh and show a page similar to the POS page. The kiosk is now active!
-
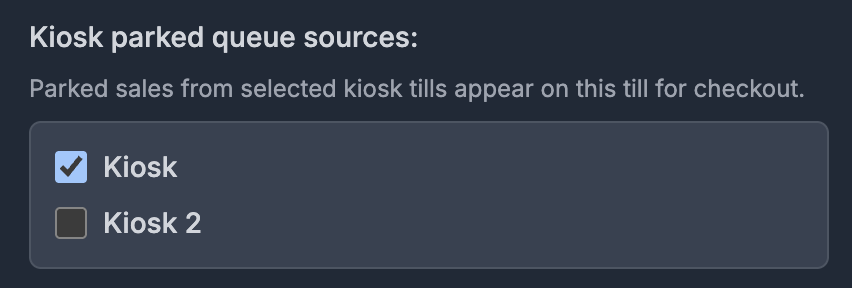
Open the Tills->Manage menu and find the till that will be used to process kiosk purchaes. Click on the "Edit" button for that row, and find the "Kiosk parked queue sources" section.
In this section, check the box next to the kiosk and the click "Save Changes"
- When a kiosk user submits their purchases, you can now access the sale through the Parked menu of the primary till.


Creating a Product (In Shopify)
Products can be created in ScryPOS and Shopify - at this stage ScryPOS's product creation tools are still catching up to Shopify's and so I generally recommend creating new products in Shopify for now - however, when creating products with multiple variants I recommend checking out the ScryPOS product creation tool which streamlines this process.
Important Note: You can set an inventory for a product in ScryPOS before you have created the product and this inventory will sync to ScryPOS - Inventory adjustments made in Shopify after the product has been created will NOT sync to ScryPOS - ScryPOS sync's one-way with inventory and inventory adjustments must be made in ScryPOS.
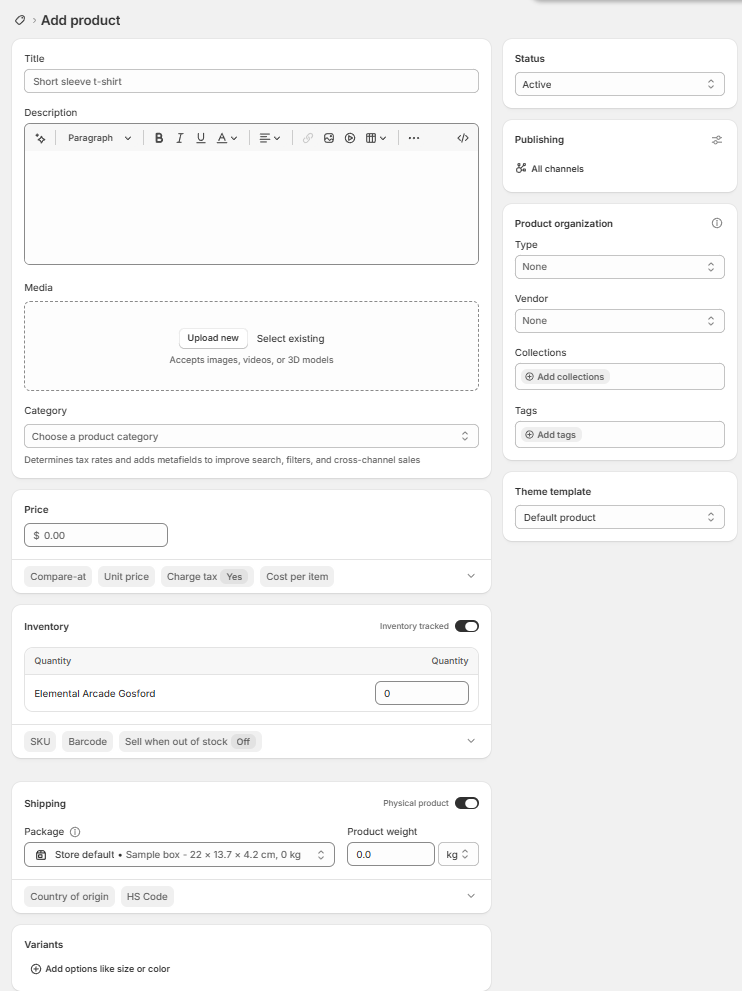
Shopify Product Creation Summary
Title: The name of the product - Shopify uses this when creating the product handle which is a unique identifier for the record.
Description: This is the product details - this is only visible on the website and not within ScryPOS
Media: Product image(s) - multiple images can be viewed on the website and the hero image is viewable in search results and in ScryPOS when managing inventory, when performing a sale or when sending a customer receipt.
Category: Shopify's own Category system which smartly ties into agentic markets.
Price: Your advertised sell price - this is the price ScryPOS will use and the price your customers will purchase items for online
Compare-at: This is a comparison price you can use on the website as tool to display a Sale price
Cost per item: Cost per item is your wholesale purchase price of the item. Note this is not native tax inclusive or exclusive - it is up to you to maintain your product data here consistently
Inventory Tracked: By default ScryPOS is tracking inventory for all items but for web sales you can you tick or untick this to allow or prevent the same of items based on stock on hand.
SKU: SKU that you can define or manufacturer SKU
Barcode: Product Barcode - note some scanners have trouble with barcodes with a leading "0" so it may be best to omit the 0 from the start of some of your barcodes depending on the model of scanner you are using.
Inventory Quantity: If you have an initial inventory level you can set this here.
Physical Product: Toggle for digital or physical products that require shipping. ScryPOS does not interact with this field.
Weight: Product weight - often used for shipping calculations. ScryPOS doesn't interact with this value.
Status: Shopify specific. This flag will determine whether the item will show in enabled sales channels or not. No implications on ScryPOS
Publishing: Sales Channels you are enabling this products to be sold in
Product Organization Settings
These are used by ScryPOS and are a great way to keep your data organized
Type: Create your own categorization structure using the Shopify product type field. This is great for configuring Shopify collections and grouping products in the ScryPOS Custom product search filters.
Vendor: Use this to track either manufacturers, publishers and/or supplier vendors that you receive stock from. It's just another tool to help you group relevant product types and record the information that is most relevant to how you want to set up your site.
Collections: Manually assign to a collection. Alternatively if you have built smart rule-based collections they will automatically add items to relevant collections.
Tags: One or Many tags can be created and added and Shopify sites have a lot of native functionality built into them to help users interact with your product database based on how the items are tagged.
Creating Customers
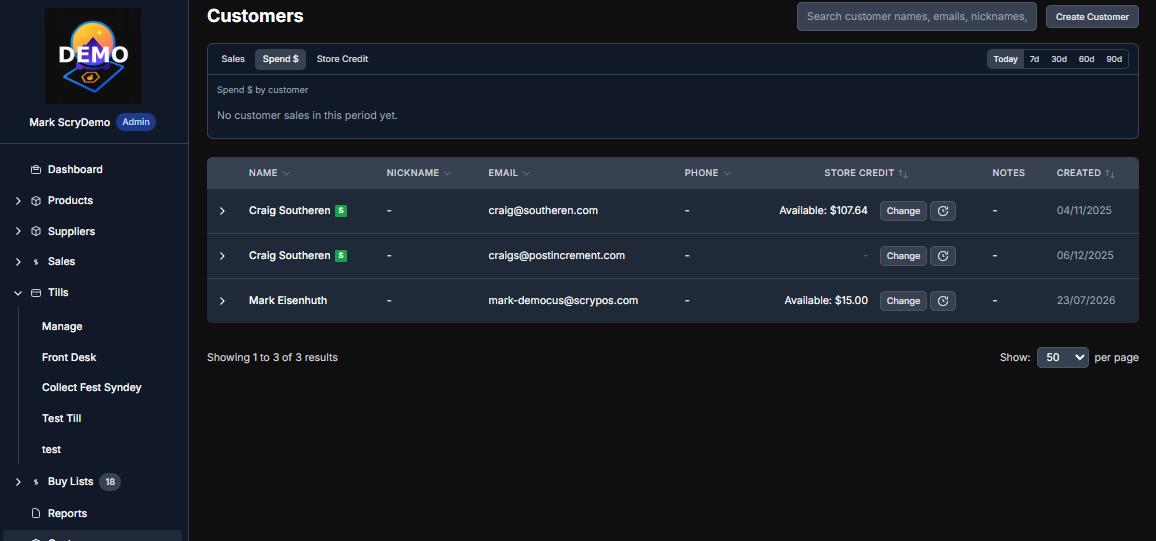
Customer can create themselves by placing orders on your Shopify website and by accessing the customer portal and creating an account but you can also create your own customers! You can do this in multiple spots for easy access
You can Go to Customer > Create Customer
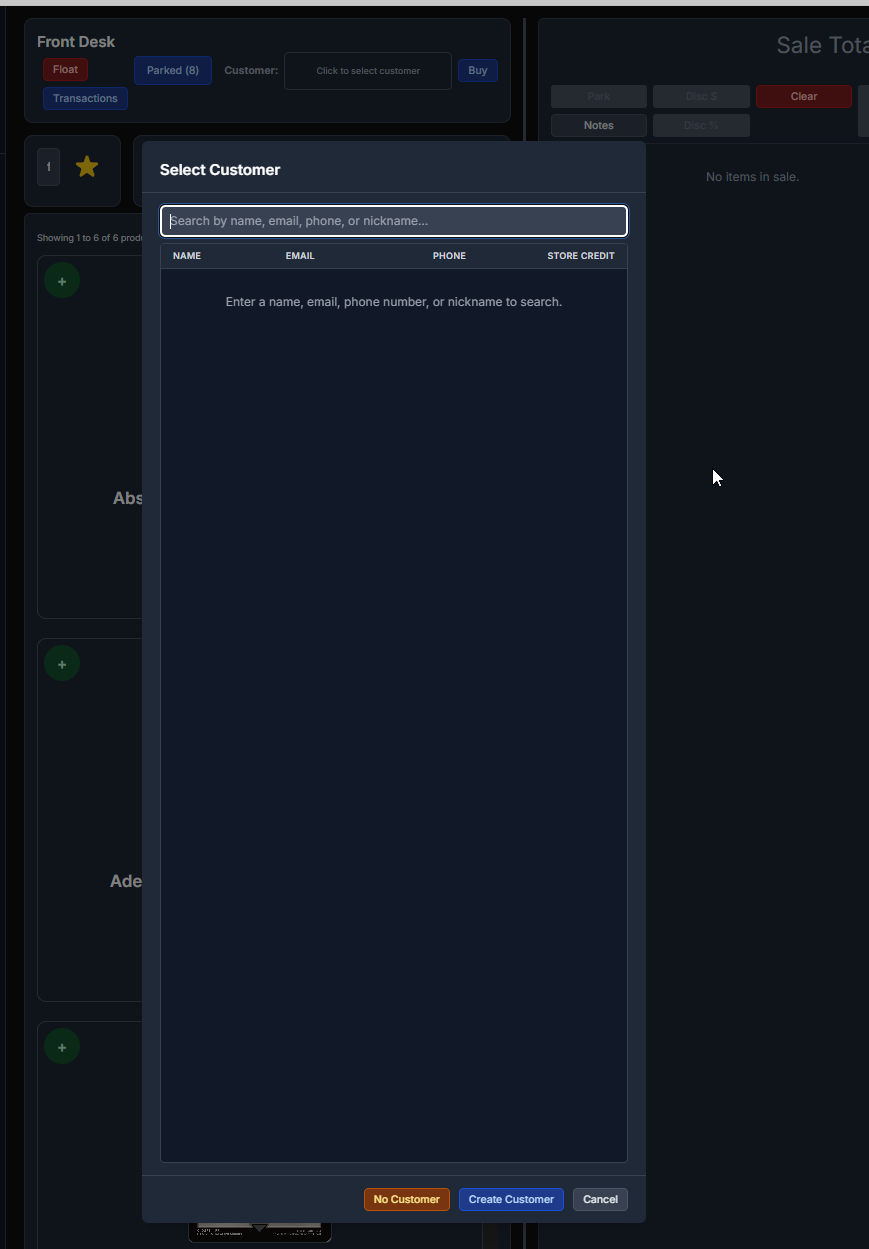
While processing a POS transaction you can go "Click to select customer" "Create Customer"
When creating a buy/sell list on behalf of a customer you can create the customer as you are creating the list
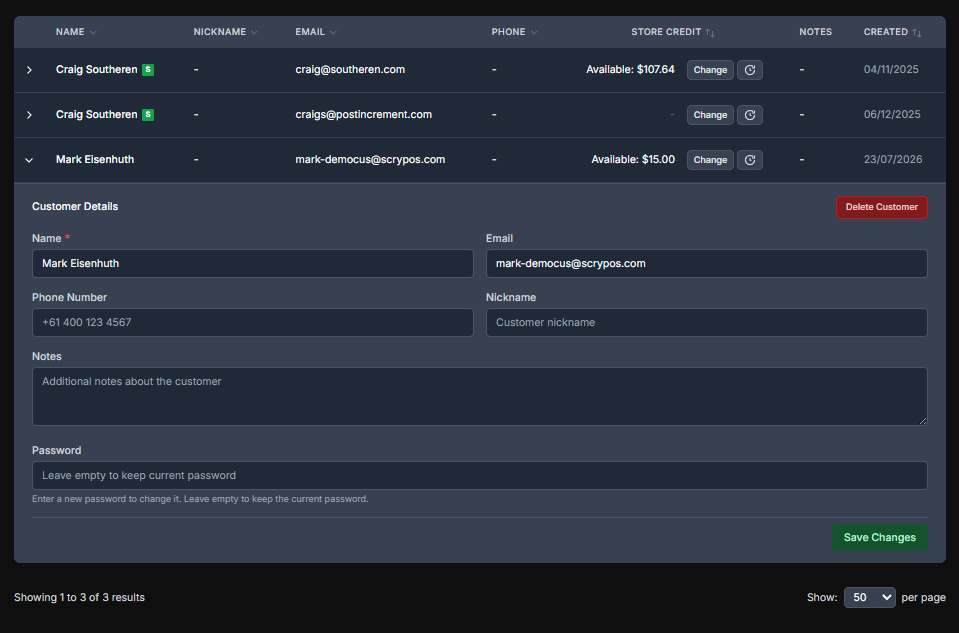
Customers can be created with the core fields or name, email and phone number but you can also
* Give your customers nicknames
* Add internal notes about the customer
* Set or Change their customer dashboard password to assist with password resets (they can do this on the dashboard login screen too)
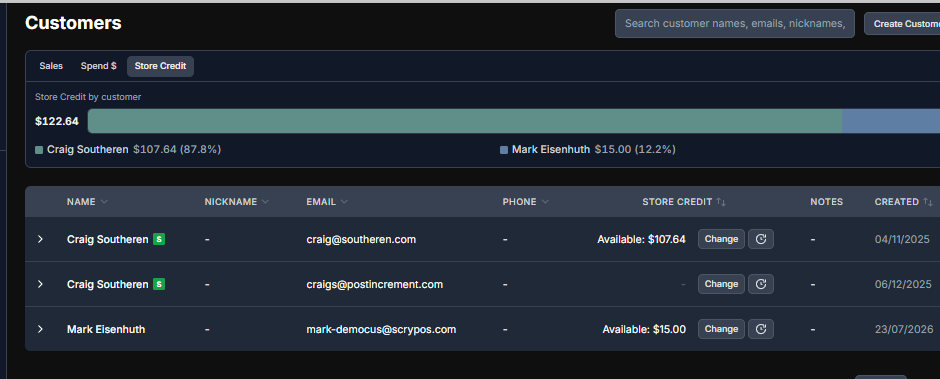
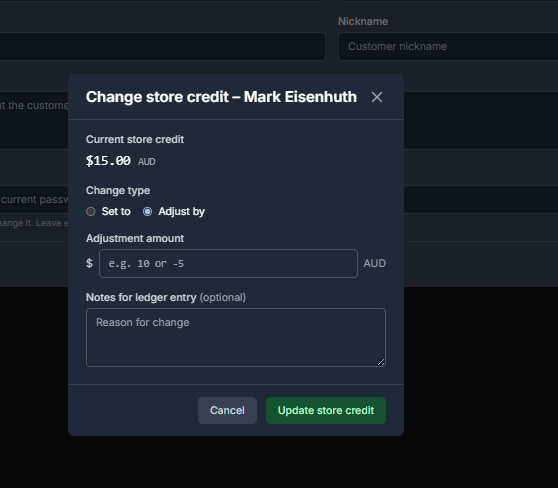
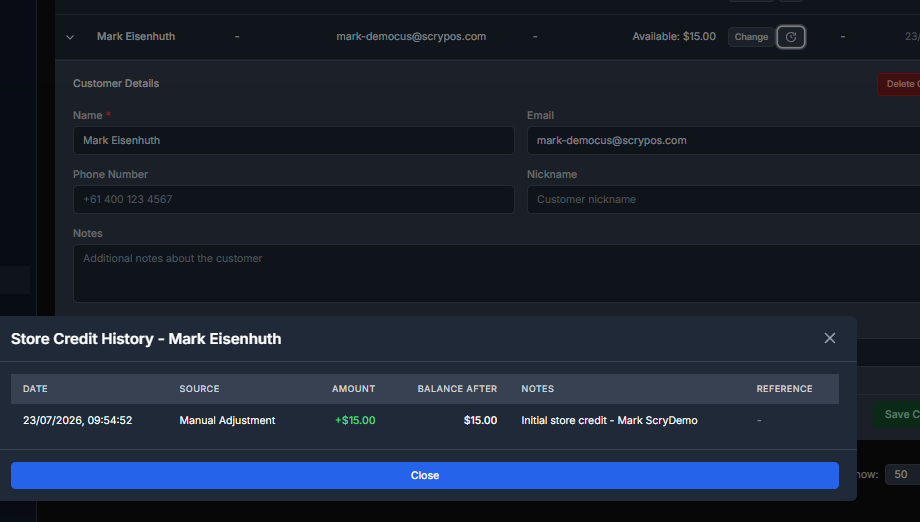
Customers can have store credit. Usually this is added through buy/sell lists but this can be added manually by clicking "change" next to their store credit on their customer record
You can adjust or overwrite their credit or you can set it to a specific amount and record a note for you and the customer that says why an adjustment occurred (Customers can see this in their customer dashboard)
 .
.You can also view the full Store Credit History by clicking on the icon next to change
Note: You can view your current store credit liability using the report at the top of the customers page which will show you your total liability and top percentile of credit holders.